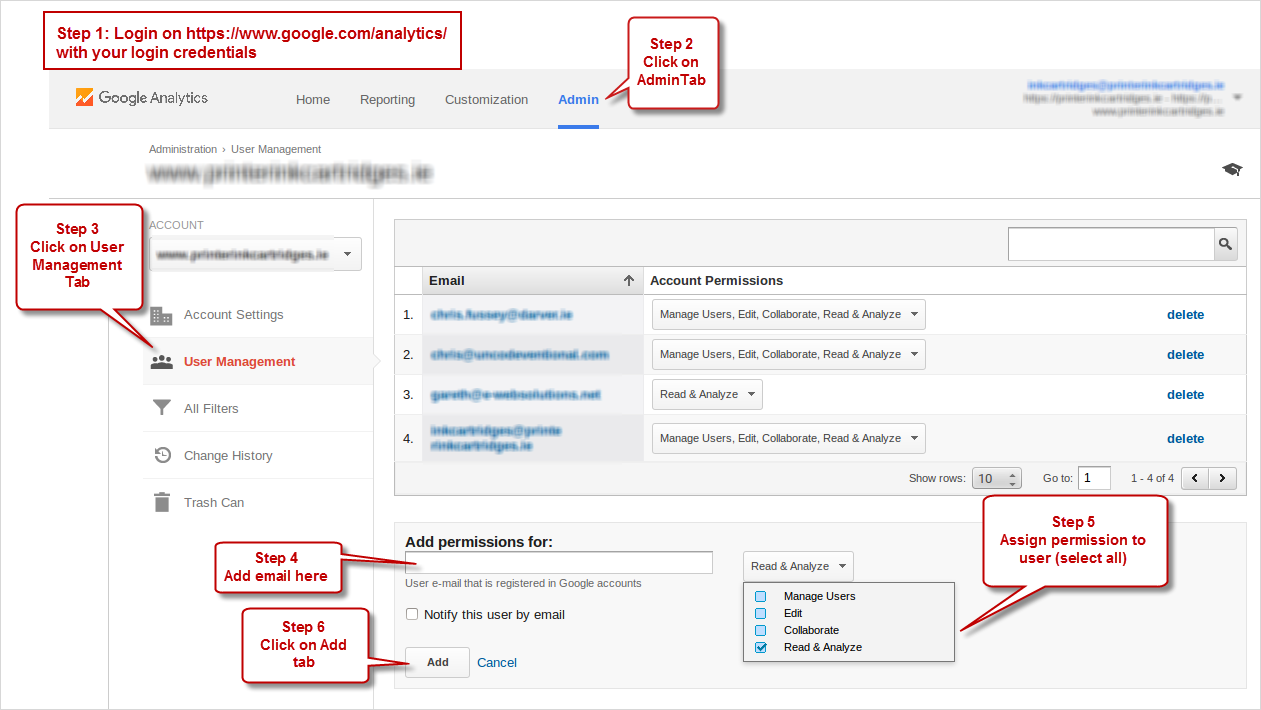
For an external agency to be able to access Google Analytics, you need to add their email.
Click on the image below and follow the steps.
knowledgebase, tips, snippets, best practices, more
For an external agency to be able to access Google Analytics, you need to add their email.
Click on the image below and follow the steps.
MySQL has a set of tools that does wonders. This is just one of them by mysqldbcompare
On a Debian / Ubuntu servers, you need to install mysql-python-connector and mysql-utilities and the following command will generate a difference SQL for the first database.
mysqldbcompare --server1=user:pass@localhost \ --server2=user:pass@localhost db_old:db-new \ -a --difftype=sql --changes-for=server1 \ --skip-data-check > diff.sql |
Let’s create a directory under the home dir so that we know where our certs are.
openssl genrsa -out domain.org.key 2048 openssl req -new -sha256 -key domain.org.key -out domain.org.csr |
Here you need to enter the details of the domain – Please note that the common name is the domain name on which the SSL will work. So, make sure whether you need the ‘www’ in place or not etc.
Now, login to your GoDaddy account and set up a new certificate under https://certs.godaddy.com/ccp/home.seam
For the CSR, you can take copy the content by
cat domain.org.csr |
and paste it to the textbox.

You can double check the CSR content at http://www.sslshopper.com/csr-decoder.html or using the following command
openssl req -in domain.org.csr -noout -text |
Once you submit, it would have to undergo validation process. An email is sent to the domain owner for verification. Once verified it will be issued and available for download – ensure that Apache is selected when downloading the file. You can upload the zip file to the server and decompress it on the server itself –
unzip domain.org.zip |
The file contains two crt files – domain.org.crt and gd_bundle.crt. Copy the certificate, godaddy bundle and the key to /etc/apache2/ssl directory
sudo cp domain.org.key /etc/apache2/ssl/ sudo cp domain.org.crt /etc/apache2/ssl/ sudo cp gd_bundle.crt /etc/apache2/ssl/ |
Now update the virtualhost entry as indicated below
Update the virtual host file
sudo nano /etc/apache2/sites-available/domain.org |
<VirtualHost nnn.nnn.nnn.nnn:443> # Admin email, Server Name (domain name) and any aliases ServerAdmin admin@domain.org ServerName domain.org # Document Root (where the public files are located) DocumentRoot /blah <Directory /blah> Options -Indexes +FollowSymLinks Require all granted </Directory> SSLEngine on SSLCertificateFile /etc/apache2/ssl/domain.org.crt SSLCertificateKeyFile /etc/apache2/ssl/domain.org.key SSLCertificateChainFile /etc/apache2/ssl/gd_bundle.crt </VirtualHost> |
For servers that are lower than Apache 2.2, use the following
<VirtualHost nnn.nnn.nnn.nnn:443> # Admin email, Server Name (domain name) and any aliases ServerAdmin admin@domain.org ServerName domain.org # Document Root (where the public files are located) DocumentRoot /blah <Directory /blah> Options -Indexes FollowSymLinks Order allow,deny allow from all </Directory> SSLEngine on SSLCertificateFile /etc/apache2/ssl/domain.org.crt SSLCertificateKeyFile /etc/apache2/ssl/domain.org.key SSLCertificateChainFile /etc/apache2/ssl/gd_bundle.crt </VirtualHost> |
If you’re setting up multiple sites, you can create individual directories so as to keep the gd_bundle.crt exclusive to each other.
Reload apache and you should be all set.
sudo /etc/init.d/apache2 reload |
For the ssl sites to work, the mod_ssl must be enabled, if not get that enabled as well
sudo a2enmod ssl |
On a newly setup Ubuntu 10.04 LTS machines, you may encounter the following error, when running commands or trying to auto complete or whatever;
warning: setlocale: LC_CTYPE: cannot change locale (UTF-8) |
Here’s the fix – open up the nano with the default setlocate
sudo nano /etc/default/locale |
Update the contents of the file such that it reads as the one below – you can select your own language settings – like en_IN or en_GB
LANG="en_US.UTF-8" LANGUAGE="en_US.UTF-8" LC_CTYPE="en_US.UTF-8" LC_ALL="en_US.UTF-8" |
To temporarily get started without a server reboot, use the following command
export LC_ALL="en_US.UTF-8" |
We should be good.
This can be used on both when a site is transferred to a new domain or from a staging URL
Many occasions you need to push for an https URL (SSL) – here’s how we can do it using .htaccess
RewriteEngine On RewriteRule (.*) http://url.to.new.location/$1 [R=301,L] |
You can leave the old copy of files there and this should ensure visitors don’t see things from there anyways.
Crons can get us to impossible situations. They can get very difficult to trace where things can go wrong. Here I’m trying to outline the process of setting up crons and logging the activities so as to help avoid chaos.
To start editing the crontab
$ sudo nano /etc/crontab |
Another way of editing the crontab is per-user crontab
$ crontab -e |
First when setting up any crons on your server, ensure that they are grouped by the various sites you need them that are hosted on the server. Comment them out clearly and have all the team members to add or modify them in the appropriate sections.
### # Crons for the site myhardworkingsite.com ### |
Secondly, make sure you keep a copy of the template that’s found on top of the /etc/crontab under each section for quick reference.
# m h dom mon dow user command |
Ensure that the script is run via cron by setting the time close to the current time on the server
$ date |
You can verify this by listing the running programs
$ ps aux | grep <the_script_file_name> |
or by listing it from the cron log as in
$ sudo tail -100 /var/log/cron.log | grep <the_script_file_name> |
Syntax Errors
To identify whether the crontab is read correctly, run the following commands – it could be bad username or bad minute or some such thing, check the recently added one, or comment and save to see others are running.
$ sudo cat /var/log/cron.log | grep bad Jan 1 00:07:01 xxxxxxxxxx cron[17836]: Error: bad username; while reading /etc/crontab # or $ sudo cat /var/log/cron.log | grep Error: Jan 1 00:08:01 xxxxxxxxxx cron[17836]: Error: bad username; while reading /etc/crontab |
Number of stars: It is very easy to get carried away in leaving an additional star on the cron string, more specifically when it is copy pasted from another one.
Missing username: When moving from cPanel based servers to VPS, we tend to paste the string from there which doesn’t have the username parameter.
Midnight: Very often, users tend to setup crons at midnight, there could be others running on shared resources cranking up the server load. Better to be safe and set the “once-in-a-day” cron to a jagged time like 2:32am or some such stuff.
By default, logging is done by the syslog daemon and configured in /etc/rsyslog.conf. It gets difficult to monitor this since lot of things are written to syslog. To have the cron logs exclusive to /var/log/cron.log, do the following
Login a root user
$ sudo -s |
Check and enable cron logging
$ nano /etc/rsyslog.d/50-default.conf |
Add the following line: cron.* look for one that is commented out and uncomment it and restart the syslog daemon. You probably need to create the cron logfile too before restarting the syslog daemon.
# Create a cron log file, this step wasn't required for 14.04 $ touch /var/log/cron # Make changes to the log file $ nano /etc/rsyslog.d/50-default.conf # and then $ service rsyslog restart |
http://www.linuxquestions.org/questions/programming-9/crontab-log-does-not-exist-552809/
To edit the hosts file in Mac, open the Terminal. It is in Applications -> Utilities -> Terminal.
$ sudo nano /private/etc/hosts |
Add the IP addresses and hostname(s) – use a space to separate aliases or multiple hostnames
192.168.1.5 myapp.local www.myapp.local
Press Ctrl-O and press Enter to save. Press Ctrl-X to exit nano.
To flush DNS cache, on terminal issue the following command…
$ dscacheutil -flushcache |
Way to go…
Many get terribly annoyed by the .svn directories that are created by the SVN clients. Here’s a quick way to list them
$ find -type d -name .svn |
To delete them now combine it with rm
$ rm -rf `find -type d -name .svn` |
Please note the reverse quote that’s on the tilde key – without the shift though 🙂
On linux systems, esp. with the huge log files, I find the following command very useful. Let’s say the file that you want to truncate is site.log, enter the following command on the shell prompt and that is all to it.
> site.log |
It retains the permissions etc. and just an empty file now.
I found this here. It’s been brought here so that I don’t miss it.
In this small Tutorial I will show you how to set up a working directory / file share between two or more Ubuntu Linux Computers.
We’re gonna share the directory /media/music on the Ubuntu Linux box ernie, in order to allow the other Linux box bert to access it and listen to ernie’s music, Let’s go!
ernie (who is sharing the directory):Just Execute the following commands in a Terminal on ernie
sudo apt-get install nfs-kernel-serversudo nano /etc/exports and add the line# /media/music bert(ro,async,all_squash)
# the following worked for me where 192.168.0.0/16 is the IP range of the LAN
/media/music 192.168.0.0/16(ro,async,all_squash)
ro means “read only”, so the others can not delete your files. If you wish to allow writing to this directory, use rw “read write” instead!
sudo /etc/init.d/nfs-kernel-server restarternie very fast, didn’t we? Now it’s bert’s turnbert (who is using the directory):Execute the following commands in a Terminal on bert
sudo apt-get install nfs-commonmkdir /var/musicsudo mount ernie:/media/music /var/music/var/music – Have Fun!/etc/fstab:Open the file using sudo nano /etc/fstab and appendernie:/media/music /var/music nfs r,hard 0 0
(Use rw,hard instead of r,hard in case you shared the File as “read write” or you won’t be able to change files!)
Setting up basic File Sharing between Linux computers isn’t as hard as everybody is saying, and I really hope this will help some Linux Beginners out there to manage it on their own.