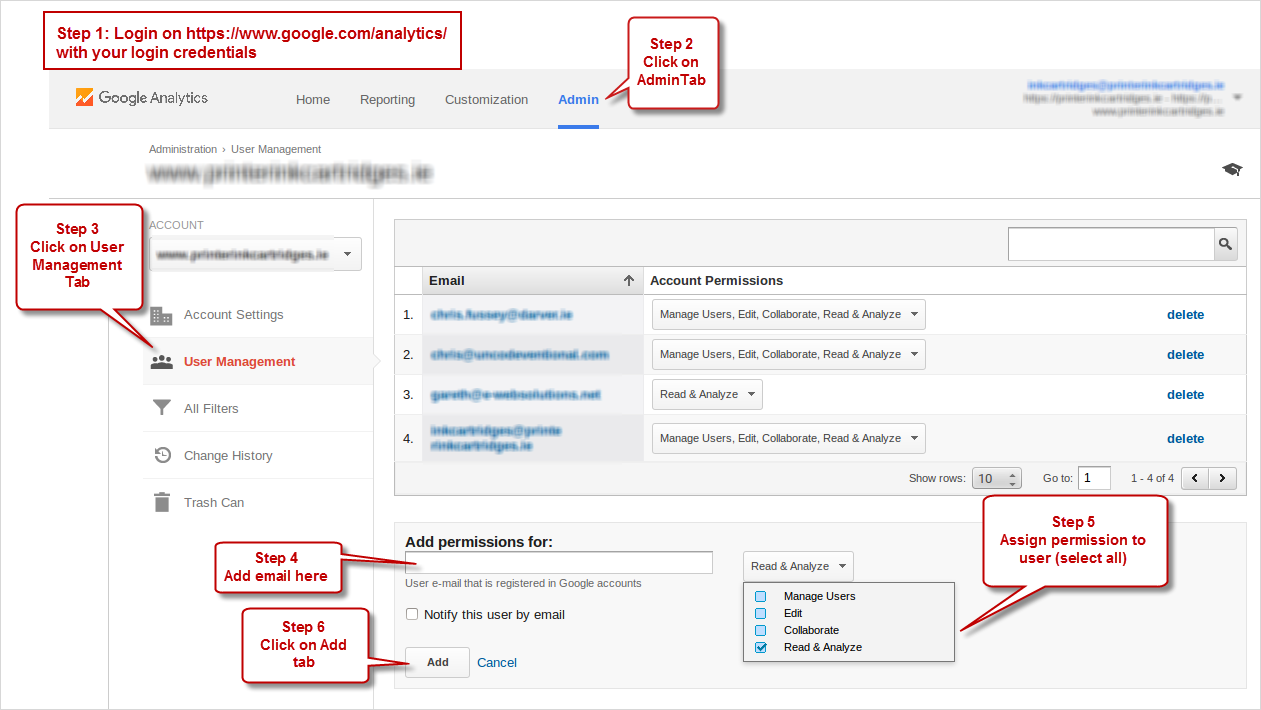
For an external agency to be able to access Google Analytics, you need to add their email.
Click on the image below and follow the steps.
knowledgebase, tips, snippets, best practices, more
For an external agency to be able to access Google Analytics, you need to add their email.
Click on the image below and follow the steps.
Let’s create a directory under the home dir so that we know where our certs are.
openssl genrsa -out domain.org.key 2048 openssl req -new -sha256 -key domain.org.key -out domain.org.csr |
Here you need to enter the details of the domain – Please note that the common name is the domain name on which the SSL will work. So, make sure whether you need the ‘www’ in place or not etc.
Now, login to your GoDaddy account and set up a new certificate under https://certs.godaddy.com/ccp/home.seam
For the CSR, you can take copy the content by
cat domain.org.csr |
and paste it to the textbox.

You can double check the CSR content at http://www.sslshopper.com/csr-decoder.html or using the following command
openssl req -in domain.org.csr -noout -text |
Once you submit, it would have to undergo validation process. An email is sent to the domain owner for verification. Once verified it will be issued and available for download – ensure that Apache is selected when downloading the file. You can upload the zip file to the server and decompress it on the server itself –
unzip domain.org.zip |
The file contains two crt files – domain.org.crt and gd_bundle.crt. Copy the certificate, godaddy bundle and the key to /etc/apache2/ssl directory
sudo cp domain.org.key /etc/apache2/ssl/ sudo cp domain.org.crt /etc/apache2/ssl/ sudo cp gd_bundle.crt /etc/apache2/ssl/ |
Now update the virtualhost entry as indicated below
Update the virtual host file
sudo nano /etc/apache2/sites-available/domain.org |
<VirtualHost nnn.nnn.nnn.nnn:443> # Admin email, Server Name (domain name) and any aliases ServerAdmin admin@domain.org ServerName domain.org # Document Root (where the public files are located) DocumentRoot /blah <Directory /blah> Options -Indexes +FollowSymLinks Require all granted </Directory> SSLEngine on SSLCertificateFile /etc/apache2/ssl/domain.org.crt SSLCertificateKeyFile /etc/apache2/ssl/domain.org.key SSLCertificateChainFile /etc/apache2/ssl/gd_bundle.crt </VirtualHost> |
For servers that are lower than Apache 2.2, use the following
<VirtualHost nnn.nnn.nnn.nnn:443> # Admin email, Server Name (domain name) and any aliases ServerAdmin admin@domain.org ServerName domain.org # Document Root (where the public files are located) DocumentRoot /blah <Directory /blah> Options -Indexes FollowSymLinks Order allow,deny allow from all </Directory> SSLEngine on SSLCertificateFile /etc/apache2/ssl/domain.org.crt SSLCertificateKeyFile /etc/apache2/ssl/domain.org.key SSLCertificateChainFile /etc/apache2/ssl/gd_bundle.crt </VirtualHost> |
If you’re setting up multiple sites, you can create individual directories so as to keep the gd_bundle.crt exclusive to each other.
Reload apache and you should be all set.
sudo /etc/init.d/apache2 reload |
For the ssl sites to work, the mod_ssl must be enabled, if not get that enabled as well
sudo a2enmod ssl |
This can be used on both when a site is transferred to a new domain or from a staging URL
Many occasions you need to push for an https URL (SSL) – here’s how we can do it using .htaccess
RewriteEngine On RewriteRule (.*) http://url.to.new.location/$1 [R=301,L] |
You can leave the old copy of files there and this should ensure visitors don’t see things from there anyways.
There are many samples around this. But I find the following one if you’re parking many domains on the same hosting…
RewriteCond %{HTTP_HOST} !^www\. RewriteRule (.*) http://www.%{HTTP_HOST}/$1 [R=301,L] |
A very useful tutorial around .htaccess I found is here.
More often than not, we may need to change the name servers for multiple domains and within the interface it is very difficult to do this as quick as you want to. First you need to go to the home page, search for it and them go about it. Here’s how I found a solution.
http://manage.resellerclub.com/servlet/JumpToDomainServlet? productCategory=domorder&domain=<yourdomain.com>
Obviously, replace the ‘yourdomain.com‘ with yours and make sure that you are logged in. This would obviously bring up the domain management page and you can get to work right from there.
Hope there’s a better one!